
8 Steps to Winterize Your Outdoor Kitchen Refrigerator
Last Updated: October 26, 2026
Quick Summary
To winterize outdoor refrigerator units, first check whether yours is outdoor-rated or indoor-rated, since indoor-rated models should not stay outside in freezing weather. Shut off and drain the water line and ice maker, clean and dry the interior completely, and keep the door ajar for airflow.
- An outdoor-rated refrigerator can often stay on the patio through winter; an indoor-rated model should not.
- Cold damages units two ways: freezing water splits lines and housings, and trapped condensation grows mold.
- Shut off the water supply valve, disconnect the line, and drain it into a pan before the first hard freeze.
- Use a breathable cover, never plastic, which traps moisture against stainless steel and invites corrosion.
- Store a removed unit upright in a dry, conditioned space and never lay a refrigerator on its side.
Table of Contents
- Can an Outdoor Refrigerator Stay Outside in Winter?
- When to Winterize Based on Your Local Climate
- What You'll Need Before You Start
- Step 1: Power Down and Empty the Refrigerator
- Step 2: How to Drain an Outdoor Refrigerator Water Line and Ice Maker
- Step 3: Clean, Scrub, and Dry the Interior
- Step 4: Door-Ajar Methods and Outdoor Refrigerator Winter Storage
- Step 5: Protect the Unit from Snow, Rain, and Moisture
- Spring Restart: What to Check Before You Plug Back In
- Frequently Asked Questions
Can an Outdoor Refrigerator Stay Outside in Winter?
The short answer: it depends on the unit. An outdoor-rated refrigerator can often stay on the patio through winter; an indoor-rated model should not. Learning how to winterize outdoor refrigerator units starts with reading the label, not the weather forecast.
The honest answer: "outdoor refrigerator" covers two very different appliances.
Outdoor-rated refrigerator means the unit is built to handle temperature swings, moisture, and sun exposure. Indoor-rated refrigerator means it is built for a climate-controlled room, and cold, damp air can damage it.
Match the winter plan to the rating on the unit.
Outdoor-Rated vs. Indoor-Rated Units
An outdoor-rated refrigerator is sealed and insulated to survive weather. Stainless steel construction, sealed seams, and weather-resistant components are the usual markers. These units are designed for year-round exposure.
Indoor-rated models are a different story. The Videl 4.5 Cu. Ft. Compact Refrigerator, for example, is listed as not outdoor rated despite its 304 stainless steel exterior and ETL approval.
If you are unsure which type you own, our guide on indoor vs outdoor rated refrigerators breaks down the key differences.
When to Winterize Based on Your Local Climate
The right timing depends on two things: the lowest temperature your refrigerator is rated to operate in, and your area's two-week forecast.
Start With the Unit's Rated Operating Range
Every outdoor-rated refrigerator has a specified ambient-temperature range in its manual or spec sheet. That range matters, not the calendar. A unit rated to a certain low can typically stay plugged in and running above that threshold; a unit with a narrower range, or no outdoor rating at all, needs shutdown and protection well before the forecast approaches its lower limit.
Use Forecast Lows, Not Frost Warnings
A simple rule of thumb many technicians use: if you would not leave a garden hose charged overnight, you should not leave a refrigerator water line charged either.
Timing by Climate Pattern
| Climate Pattern | Practical Trigger | Primary Risk |
|---|---|---|
| Mild winters, frost rare | First forecast low near freezing | Condensation, mold, odors |
| Regular freezing nights | Ten-day forecast shows a hard freeze | Frozen or split water lines |
| Long, hard winters | End of patio season, before first hard freeze | Split lines, cracked seals, compressor strain |
| Year-round use | Full shutdown only if the unit will sit idle for weeks | Stale odors, mold in an idle unit |
The Two Failure Modes Cold Causes
Cold damages an outdoor refrigerator in two ways:
- Freezing water. Any water left in the supply line, ice maker, or filter housing expands as it freezes and can split the line or crack the housing. This happens at the first hard freeze, not mid-winter.
- Trapped condensation. A unit shut down while still damp, then sealed up, grows mold and odors over months. This risk starts as soon as the unit stops running and the interior stays humid.
What You'll Need Before You Start
Gather supplies first so you are not running back to the garage mid-job.
Here is an outdoor kitchen winterization checklist:
- Owner's manual for your refrigerator
- Towels and a shallow pan for drips
- Mild soap and a soft sponge
- Baking soda or white vinegar for odors
- Paper towels for drying
- A wedge or towel to hold the door ajar
- A breathable cover, if your unit needs one
- Adjustable wrench for the water line
If you are winterizing the whole cooking area, 7 steps to winterize your outdoor grill pairs well with this job.
Step 1: Power Down and Empty the Refrigerator
Next, empty everything:
Videl Outdoor Premium Refrigerator →
- Remove all food, drinks, and ice
- Take out the ice bin and dump it
- Pull out shelves and drawers so you can clean them separately
- Check the freezer compartment for forgotten items
If you are planning an upgrade, browse outdoor kitchen collections.
Step 2: How to Drain an Outdoor Refrigerator Water Line and Ice Maker
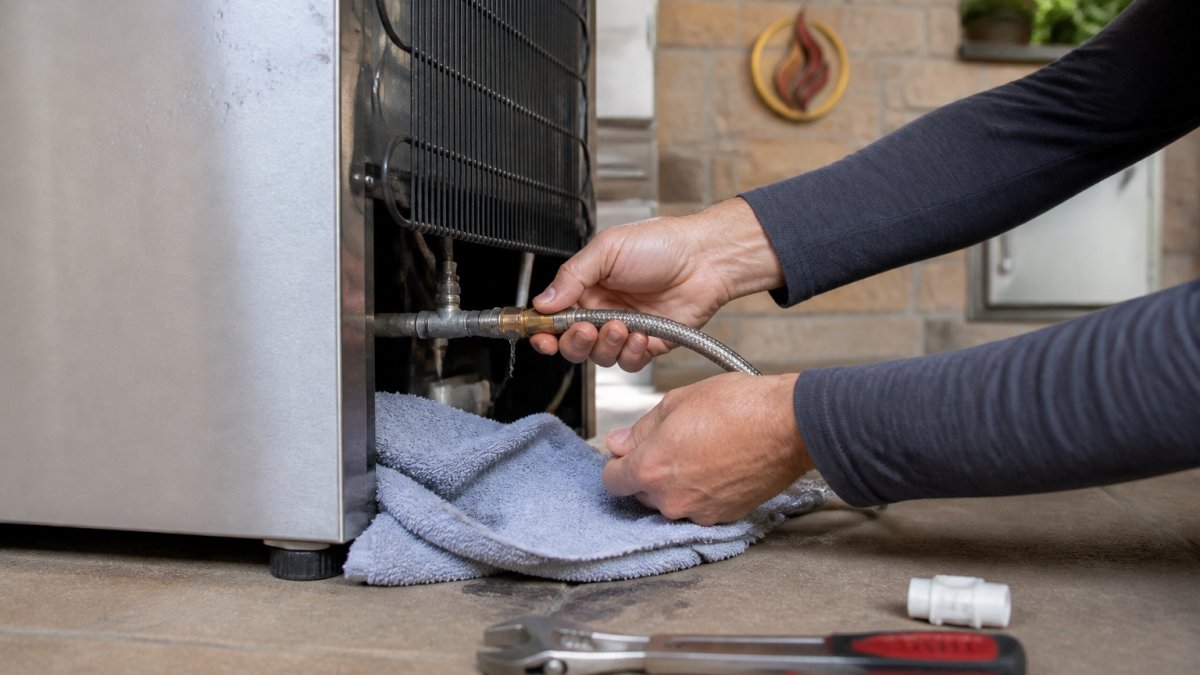
Here is one way to drain an outdoor refrigerator:
- Shut off the water supply valve feeding the fridge.
- Disconnect the water line at the back of the unit.
- Let the line drain into a pan or towel.
- Empty the ice maker tray and wipe it dry.
- Blow a little air through the line if you can, to push out trapped water.
- Leave the line disconnected or capped for the season.
Step 3: Clean, Scrub, and Dry the Interior
Work through it like this:
- Wash shelves and drawers in warm soapy water
- Wipe the interior walls with mild soap
- Scrub the door seal with a soft cloth
- Rinse and dry every surface completely
- Place an open box of baking soda inside to absorb odors
Use paper towels to reach corners and the door seal.
Step 4: Door-Ajar Methods and Outdoor Refrigerator Winter Storage
Here are three door-ajar methods:
- Towel wedge: Fold a small towel and lay it in the door gap.
- Shelf stop: Pull a shelf out a touch so the door rests against it.
- Tape trick: Tape the door lightly so it stays cracked open.
Best for: Units staying in place on a covered patio. Skip if: Your unit is indoor-rated and exposed to hard freezes. Move it inside instead.
Step 5: Protect the Unit from Snow, Rain, and Moisture
Protection is where the unit's rating decides the plan.
Decide: Leave It or Remove It
Use the unit's rating and your forecast to choose one path.
| Situation | Recommended Path |
|---|---|
| Outdoor-rated, forecast stays above the unit's rated low | Leave in place, shield from weather |
| Outdoor-rated, forecast drops below the rated low | Remove to a conditioned space, or confirm with the manufacturer that the unit is designed to sit idle in those temperatures |
| Indoor-rated, any freezing risk | Remove to a conditioned space |
| Unknown rating | Treat as indoor-rated and remove |
If the Unit Stays Outside
- Shelter the top and sides. Confirm the island or cabinet sheds water away from the unit and that no roof edge dumps runoff directly onto it.
- Use a breathable cover, never plastic. A sealed plastic wrap traps moisture against the stainless steel and invites corrosion and mold. A breathable cover lets humidity escape while blocking rain and snow.
- Keep the door ajar under the cover. The cover should not press the door shut. Use a towel wedge or shelf stop so air still circulates inside.
- Clear snow rather than let it pile up. Snow load on top of the unit and around the door seal can force moisture into places it should not go.
- Keep the base dry. Standing water around the foot of the unit wicks up and corrodes the cabinet.
If You Remove the Unit
- Store it upright in a dry, conditioned space. Never lay a refrigerator on its side; the compressor oil needs to settle back before the unit runs again.
- Cap or plug the water line at the wall so debris and pests cannot enter.
- Leave the door ajar in storage for the same ventilation reasons as an outdoor unit.
- Cover the empty opening in the island so rain and pests stay out of the cabinet.
Why the Rating Matters More Than the Cover
An outdoor-rated unit built with 304 stainless steel, like the Videl Outdoor Premium Refrigerator, resists rust and corrosion and is described as having weather-resistant construction for hot, cold, and humid environments.

If your setup has no overhead shelter, whether a covered outdoor kitchen is worth the cost walks through the trade-offs.
Spring Restart: What to Check Before You Plug Back In
Before the first warm weekend, do a quick restart check.
- Inspect the water line for cracks before reconnecting
- Reinstall the filter and shelves
- Wipe the interior once more
- Plug the unit in and let it run empty for a few hours
- Check that it cools properly before loading food
Browse our outdoor kitchen collections or reach out to our team for personalized guidance. Get started with Eternal Flame Outdoors.
Frequently Asked Questions
Can an outdoor fridge stay outside in winter?
It depends on the unit. Check the manufacturer's stated operating temperature range before deciding how to prepare the unit for winter.
Should you unplug an outdoor refrigerator in winter?
If you won't use it through the cold months, unplugging is one option. Before you power down, empty all food and drinks, then clean and dry the interior. If your unit has an ice maker, shut off the water supply and drain the line first.
Do outdoor refrigerators need to be drained before winter?
A unit with an ice maker or water dispenser may need draining before winter. Close the shutoff valve, disconnect the line at the refrigerator, and let the remaining water drain into a towel or shallow pan. Models without a water connection don't need draining.
Should an outdoor refrigerator door be left open during storage?
Leave it slightly ajar, not wide open. Prop the door open a couple of inches with a rolled paper towel or a small wedge, and do the same for the freezer compartment if your unit has one.



Leave a comment
This site is protected by hCaptcha and the hCaptcha Privacy Policy and Terms of Service apply.